Because of their portability, laptops are very flexible when connecting to a Canon printer. If you’re struggling to connect a Canon printer to your laptop, this guide will help.
To connect a Canon printer to your laptop, you have three options. You can connect wirelessly via WiFi, enable Wireless Direct, or use a USB cable directly to your Canon printer. Each method is pretty easy; here’s how to set it up:


This guide is part of our Canon printer troubleshooting series.
How to Connect Canon Printer to Laptop: 3 Ways
There are three easy ways to connect your Canon printer to a laptop. I’ll begin with the easiest connection method.
1. USB Cable Connection to Canon Printer
To print quickly, your best option is a direct USB cable connection. New Canon printers have plug-and-play functionality.
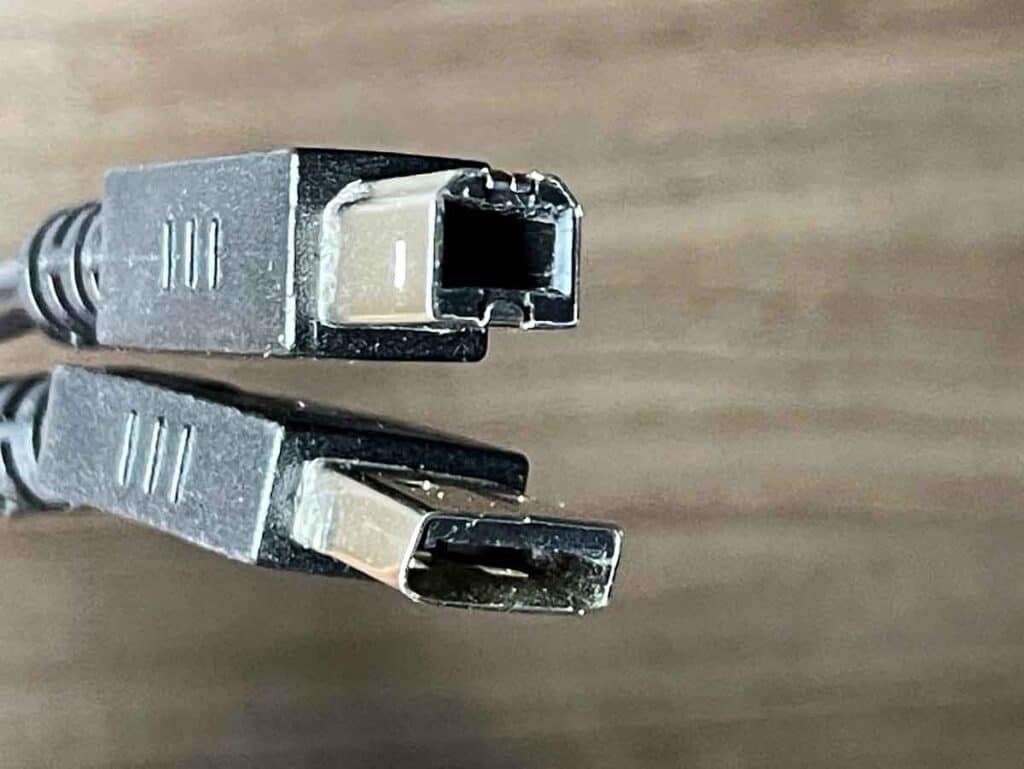
The required cable is a USB-A to USB-B. USB-A is the standard USB rectangle connector. USB-B is almost square, with two tapered edges. See image below.
Note: Most printers do not ship with a USB cable. If you don’t have one in the office, you’ll need to pick one up. This 10-ft cable by Amazon Basics will do the trick.

While USB-connected printers used to be the only way to print, things have changed. Almost all printers now come with wireless functionality. And once connected, it is very user-friendly.
2. Connect Your Canon Printer to WiFi
The best way to connect to your Canon printer is via WiFi. It’s convenient because you can print wirelessly anywhere you get a WiFi signal.
And once it’s connected, all the devices on that network can also print to that printer. This included other computers, laptops, and mobile devices.
There are 3 ways to connect your Canon printer to WiFi:
- Using a smart device through the Canon Print Inkjet app
- Using a WPS Push Button Method
- Using a WPS Pin Code
Here are the specifics to connect your Canon printer to WiFi. This guide covers all three methods in step by step detail.
Have a MacBook? We made a guide just for you. Here’s how to add a Canon printer to a Mac.
3. Enable Wireless Direct
Wireless Direct is a Canon feature that allows wireless printing without a router or WiFi access.
This works even when away from your home/office wireless network. And it’s also helpful for wireless printing when your home/office network is down.
For this to work, you’ll have to set this up using one of the first two methods (USB or WiFi). And once it’s set up, you won’t need either.
Here’s how to configure your printer for Wireless Direct:
- Enable both Wi-Fi and Wireless Direct in your printer LAN settings. More below.
- Install Wireless Direct on your laptop.
Remember: These steps must be performed before leaving home.
When you use the printer with the wireless direct, be sure to specify the access point name (SSID) of the printer and the security setting in advance.
manual.canon
Here’s how to configure LAN settings.
- Switch WL Direct: Enables/disables Wireless Direct function.
- Change name (SSID): Changes the identifier (SSID/the printer’s name) for Wireless Direct.
- Change password: Modify the password for Wireless Direct.
- Confirm request: Select if you want the printer to display a confirmation screen when a compatible device connects to the printer.
Here’s more about configuring Wireless Direct.
Is your Canon printer giving you some trouble? Here’s the full guide to resetting a Canon printer.
Your Turn
How did it go for you? Which method did you use to connect your Canon printer to your laptop? I would love to hear about your experience and tips in the comments section!
Bryan Haines is a co-founder and writer on PrintLikeThis. We troubleshoot printer problems to get you back to printing.
He also writes at Storyteller Tech and is a travel blogger at Storyteller.Travel. Bryan is co-founder of Storyteller Media, a company he started with his wife, Dena.