Wireless printers make printing so much easier. Does anyone even use a USB cable for their printer anymore? But connecting your Epson printer to WiFi isn’t always a seamless task.
In this guide, you’ll learn the 3 easy steps to connect your Epson printer to WiFi. And we’ll also answer some of the most common questions and problems about WiFi connectivity for wireless printing.

Thanks to an intuitive interface and this guide, you’ll connect your Epson printer to WiFi in just a few minutes.
Step 1: Before You Connect Epson Printer to WiFi
First things first, get your WiFi password.
You’ll need both the network name (SSID) and your password to connect your Epson printer to your WiFi network.
This is the same password you use to connect your phone, tablet, and television to your WiFi.
Can’t find your password? Here’s what to do next:
How to Find (or Reset) Your WiFi Password
If you can’t find your password, the first step is to locate your WiFi router/modem.
On the side of your WiFi access point, there should be a label displaying the network name (SSID) and network key (password).
On my Asus router, it shows the default URL of http://router.asus.com The username and password are both admin.
Once you log into your router, you can either access your password or change it.
Either way, it’s a good idea to
- Record the network name (SSID).
- Write down the encryption key (password).
Once you have both, continue to step 2.
Step 2: Connect to the Wireless Network (2 Options)
Now it’s time to connect your printer to WiFi.
Depending on which Epson printer model you have, the process of setting up your machine should follow a similar step-by-step procedure.
To set up your Epson machine on a wireless network, follow options 1 or 2:
Option 1: Printer Without Touchscreen Function
- Unbox your printer and plug the machine into a power source.
- Power on the machine by pressing the power indicator one time.
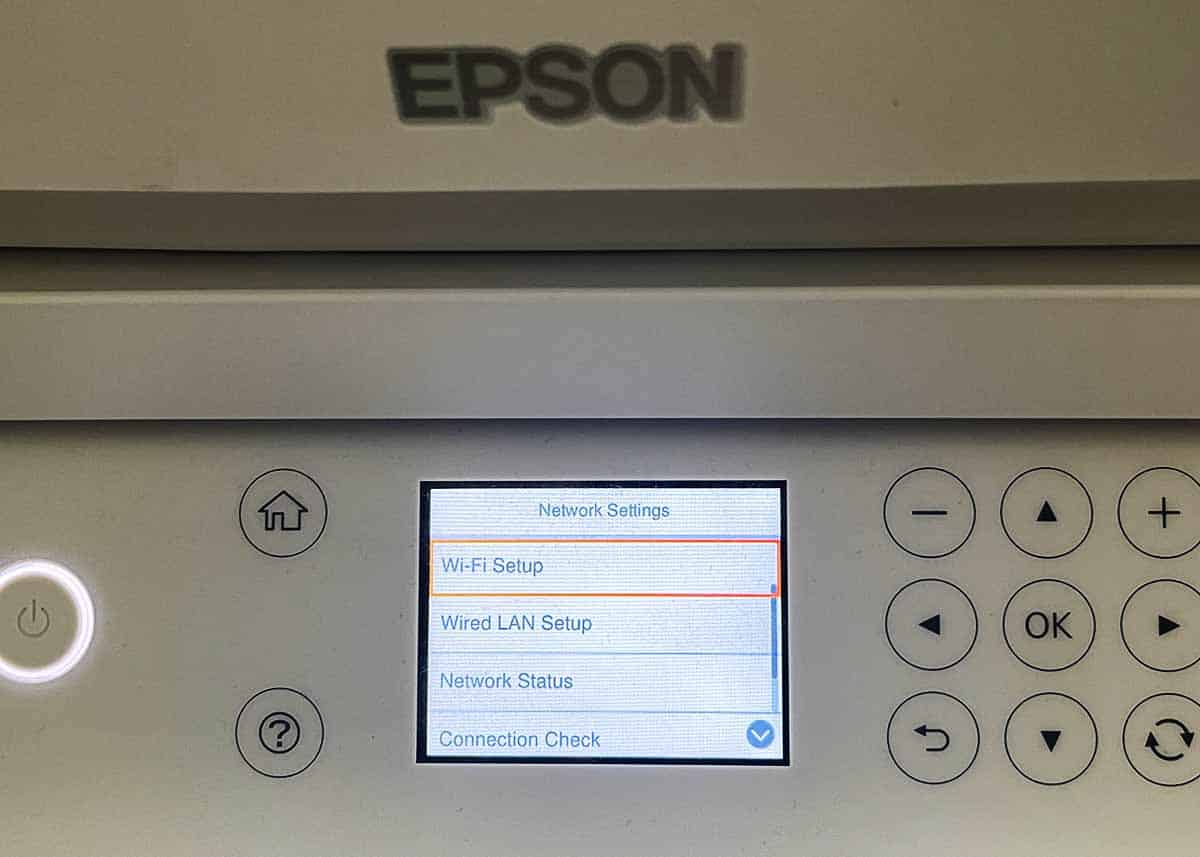
- Once the machine is on, click the menu button.
- Using the up and down arrows, navigate to the sub-menu of network settings and press OK.
- Press down to find the WLAN selection and press OK.
- Press the up or down button to select the Set-up Wizard option.
- After activating the Set-up Wizard, you will need to click Yes when it asks to Enable WLAN.
- Your printer will search for available networks and display them for you to select. Using the arrow keys (if there are multiple networks), locate the network you wrote down earlier and select it.
- If required, plug in the password for your network.
- Your Epson printer should display a message to tell you that it has connected successfully.
Here’s a great tutorial using this method.
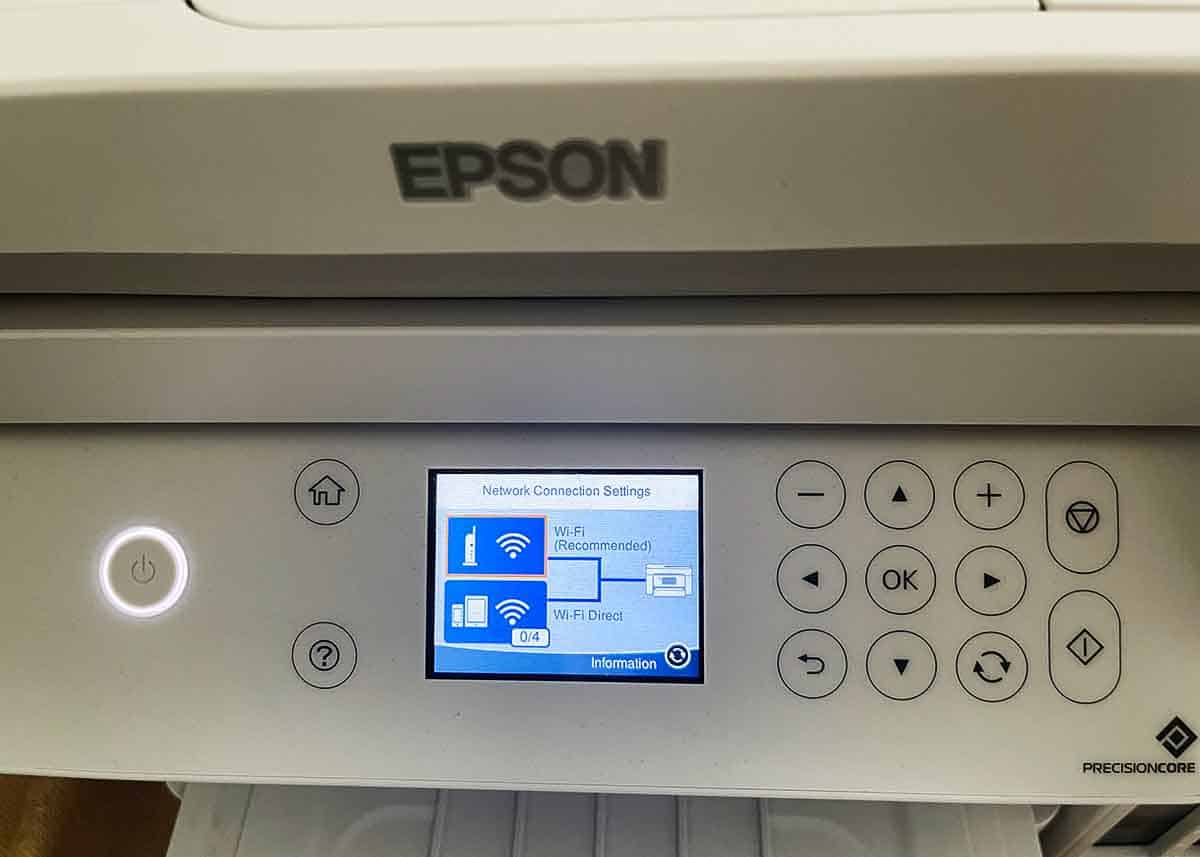
Option 2: Touchscreen Printer With a WiFi Button
- Power on your machine after connecting it to power.
- On the touchscreen display, press the WiFi icon.
- Select Set-up Wizard.
- Click Enable WLAN.
- Select your network from the list.
- Enter the wireless network key (password).
- The printer will display a successful connection message.
Here’s a step-by-step guide.
Step 3: Download & Install Epson Printer Software
Once your Epson printer has established its WiFi connection, it will need one final step before printing can begin.
All printers require up-to-date software and drivers. A printer’s software and driver will allow the computer and machine to communicate effectively, allowing a print job to be accepted and readable.
To download the correct driver for your Epson printer, navigate to the driver downloads section:
- Click the support tab at the top of the website.
- Under the drop-down menu, click Software & Driver Downloads.
- Enter your printer’s model number in the search bar.
- Download the recommended software and driver for your printer model by following the instructions carefully.
Keep Learning: Guide to Wireless Printing.

Need your IP address? Here are 4 ways to find your printer IP address.
6 Common Epson Printer Problems
You might encounter some problems preventing your printer from receiving a print job. Below, are common problems Brother users experience:
Below are some of the most common questions that customers ask.
1. Can I connect my Epson printer to multiple networks?
Yes, you can connect your Epson printer to any WiFi network that you wish. To connect to a new network, you will need to follow the steps above for each new connection.
2. How do I check my printer’s wireless status?
Check your printer’s wireless status by printing the WLAN report. Under your printer’s settings or menu, find and select print reports.
From there you need to select the WLAN report. The printer will ask you if you would like to print in black and white or in color.
Choose your print option and read click OK to print.
Here’s how to fix your Epson printer offline.
3. I can’t print on a wireless network
Sometimes a printer will not print when on a wireless network because there are underlying errors that need to be accessed first.
First, access all errors and then try printing again. If still not working, reset your network settings to factory default and it should work.
5. My mobile device won’t connect to the printer
Make sure your mobile device is connected to the printer’s WiFi using wireless or WiFi direct.
Connect to the Epson printer via the Epson iPrint app on Android and iOS.
6. What If You Don’t Have a CD Drive for Drivers?
7. Nothing Works – Help!
If you just can’t get it to do anything, consider doing a factory reset on your Epson printer.
Here’s how to connect your printer to WiFi.
Your turn
You now know how to connect an Epson printer to WiFi. Using the three simple steps listed above, you will be able to connect any (WiFi-enabled) Epson printer to a wireless connection.
How did it go for you? I would love to hear about your experience.
Bryan Haines is a co-founder and writer on PrintLikeThis. We troubleshoot printer problems to get you back to printing.
He also writes at Storyteller Tech and is a travel blogger at Storyteller.Travel. Bryan is co-founder of Storyteller Media, a company he started with his wife, Dena.